Makeup Exploration
Bethany Lane


-
Cream latex base
-
Foaming Agent
-
Curing Agent
-
Geling Agent
-
Pigment
-
Electric Whisk
-
Extractor
-
Oven
20% Foaming agent to latex.
14% Geling agent
An electric whisk is used to quickly whisk the components until you have the consistency you want. The longer you whisk, the less gel is required.

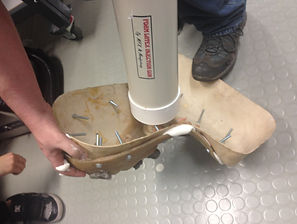

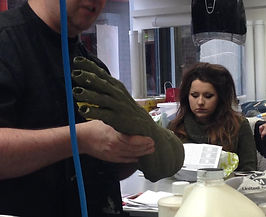
Injecting Foam Latex
-Gille Paillet
Foam Latex examples
Using foam latex:
- more geling agent is required in hotter weather
- store out of the cold, heat and UV light
- once opened, latex has a 6 month life
- you can ru foam latex in a silicone mould and a fast cast mould (non porus)
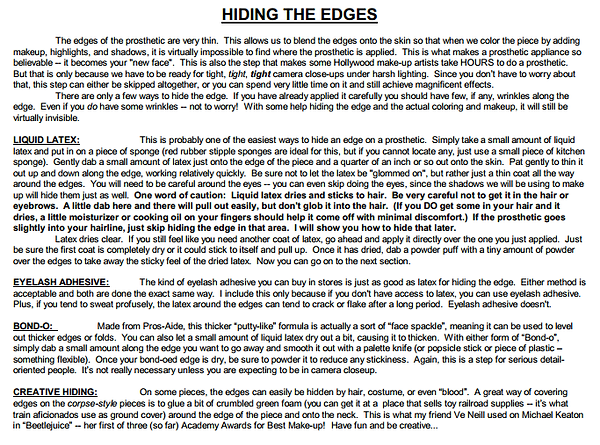
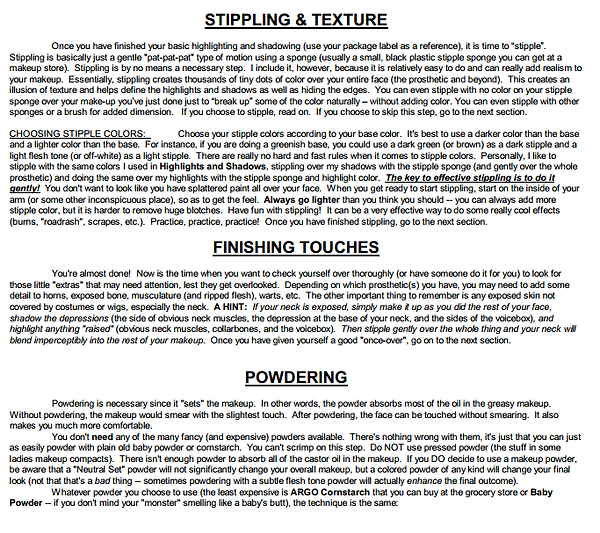
Applying and Colouring Foam Latex
-
Apply small amout of prosaide into center of the piece and print onto skin
-
Hairdry piece and skin
-
Sticking down, apply prosaide to unglued edges and allow to start to dry, then press down
-
use prosaide ariund edges of piece to smooth into skin
-
Using cabopatch, fill edges with spatula
-
repeat this and dry inbetween
-
Poweder over whole picece
-
then seal with a layer of stippled porsaide (helps give texture)
Colouring
-
Mixing IPA with Supra color gives a wash which creata a layer to build
-
use red colour for base as it isn't translucent like silicone
-
build up to finally match skin colour
-
Skin Illustrator will sit on the piece and highlight any lumps in glue, so this may be more suitable if flicked on
-
Airbrush is another technique
Watching this was useful to pick up on the injecting technique for foam latex, gelatine and silicone, in which I intend to use for my project.
To inject into the mould, the bolts are done up but slightly loosened and as it is injected, any overflow holes are blocked up. Once injected the bolts are tightened up and it is left to
 Application |
|---|
 Colouring |
 Finalising |
Unfortuntately I was unable to apply this piece as it ripped and distorted. My model from which this mould was made was also unavailable for this to be applied.
I would like to develop my experience with foam latex in the future when possible. Although there are many risks of it not coming out successfully, I would still liek to try and create an appliance to apply, in order to properly experience working with foam latex, especially in the application and colouring process.
Here, I used cut outs from the flashing edge, adn attempted ot carve an appliance from theleft over foam I had. Although this was unsuccessful, it gave me an idea of what it's like to work with foam. I found that this paprticular piece was quite thick, so was quite difficult to disguise the edges. I used cabopatch to try and create a smoother transition from foam to skin, however when it came to painting over this, the thicker areas tended to squash down with slight pressure.
Scream Team, (n.d) Make-up Instructions. [online] Available at:http://www.screamteam.com/sg_userfiles/screamteaminstructions.pdf [Accessed 21 Feb 2015]
Application and Colouring Foam Latex
-Peter Tindall
These alternative methods would be interesting to try as I found that I struggled to use bond-o as the built up layers had a tendency to squash with anny applied pressure.
Layering liquid latex with a stipple sponge may also be a more discrete method as this gives a more textured finish to blend in with the skin texture.
These tips are useful for quickly recognising the best ways to work with the characteristics of foam.
I found that powdering between layers of makeup helps to build substance and a stronger coverage.

I tried to apply the nose to myself but it was too big. However the edges were thin and didn't need much work to disguise them. I didn't pain it as it kept moving on my nose because the size was far of so I had no stabliity to work with.