


Life Casting
In preparation for life casting my model, I made a generic bald cap from cap plastic. As I applied each layer in alternate directions, this gave the bald cap more stretch to ensure this would fit my model.
To assist me, I had Clare Hedges and Kate Wakefield as they were both confident and experienced in life casting too.
Using hair grips, I gripped back the length of my models hair, slick back off his face. This was enough to create a smooth surface to apply the bald cap on top of. Then using prosaide I tacked down the bald cap and proceeded to apply valeline to brows and eyelashes.
Using a sharpie, I marke don his hairline and ears, as I will need to know where these are for when I start sculpting.
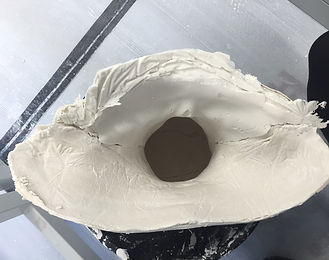
Before removing the cast from my model, I marked on lines to make sure each half matches up when put back together.
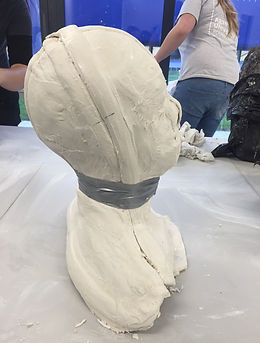
I then bound the two halves together using gaffa tape. I measured out a scrim layer to strengthen the neck and shoulders. I then mixed up a thin batch of plaster to pick up detail, then followed by thicker batches, i filled the head and began to hollow out the neck and shoulders on top of the scrim.

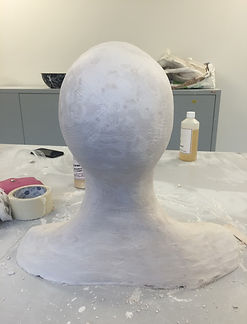
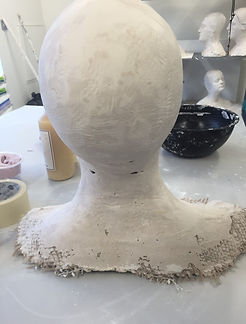

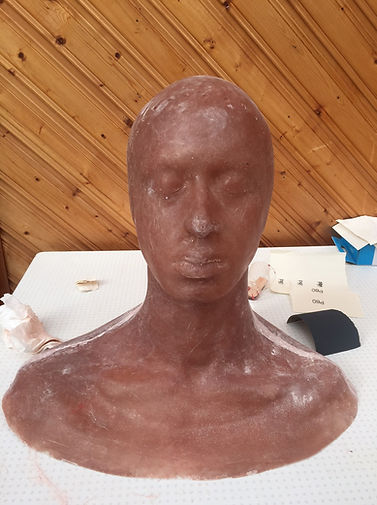
When I demoulded the plaster head, there were a few minor air bubbles and scrim showing through the shoulders. To fix this, I mixed up plaster and filled the holes and smoothed over the scrim. I then began to sand down and lumps and unwanted texture in preparation for mounting and pouring silicone.
I was very happy with the outcome of this head as I have not produced a plaster head before. Overall this was a neat and successful cast and I will use this method again as it was much more inexpensive using alginate, rather than doing a silicone life cast.


After applying the gel coat, I waited until it became tacky, then I mixed up my resin and used talc to thicken the batch so that I could fill the keys to make it easier for mem to fibreglass into them, as they are prone to creating airbubbles, which would create weaknesses in my mould.
I used shellac and cling film to ensure that ym clay wall didnt dry out over night whilst I waited for the fibreglass to cure.
 |  |
|---|---|
 |  |
 |
 |
|---|
 |
 |
 |
 |
|---|
 |
 |
 |
 |


To demould my head, I used wedges and chisels to break the suction and reveal the core. This was a very neat and successful core. I managed to throughly gel coat the forst layer, making it smooth and free from airbubbles.Using a vibrasaw, I removed all of the sharp fibreglass edges and sanded them down for better handling and appearance.
There were a few air bubbles around the nose, but I managed to ping them off with a sculpting tool.
Here is my core, sanded down and filled with carbody filler to fill any unwanted imperfections.
This was then sanded thoroughly along the seamline to ensure threr were no ridges. It is now ready to be sculpted on to.
As a guide, I used Stuart Bray's videos on his Youtube channel. Thse were broken down into 3 part videos.
I based my process on his method, however a few things were slightly different as I chose some quicker methods. As soon as I had the fibreglass on the back, I poured my moulding 3481 silicone onto the front and made keys which I let cure before moulding in fibreglass.
Fibreglass Core Research
Bray, S. (2009)
In this second video, we see that he took his time over making a very definite key pattern for his fibreglass jacket. Although this was a very neat and tidy way of doing it, this meant that more silicone would be required to fill his large keys.
If I were to make a fibreglass jacket again, I would definitely spend my time creating perfect industry standard moulds. I also think this would have helped my silicone layer to sit in the fibreglass jackey more securely, reducing risk if a slipping seam.
Throughout this fibreglassing process, Stuart uses choppies, which are a much more refined fibreglass as they are loose strands of glass. I used this when moulding and seaming my core and also when moulding my sculpt as there were tiny details that needed to be picked up. This also helped when trying to keep the fibreglass flush to the shim at a 90 degree angle.